Building an online store platform using Appwrite and Flutter - LocalEase
In this session, we will try making an online store platform connecting users with local shops and small businesses. The client application would have two interfaces, one for sellers and one for customers. Depending on the type of account you create user will be routed to that section. With real time store details, users will stay updated on the latest offerings. Subscribe to their favorite stores for personalized notifications about stock, exclusive offers, and special discounts. Users can choose their location to get nearby stores with their site, distance, opening and closing times, and contact details. For sellers, the app would provide an intuitive store form for easy management to create and update store details, showcase products, and manage inventory effectively. Subscriber notifications would help engage with customers and can view details of their subscribed users.
This project aims to solve broadly three issues.
There's no way to know if many small shops and street vendors are open for the day.
Check the availability of the items users are looking for
The precise location and contact details of the stores where they are opening for the day
Tech Stack
We will use Flutter to build the frontend application and Appwrite Cloud as our BaaS. Appwrite offers a variety of features right out of the box, and the number of SDKs it supports is crazy.
Software required and Installation
I will be using Android Studio as my IDE. You can use any IDE of your choice. Make sure you have installed Dart and Flutter plugins in your IDE and Flutter installed in your system. That's the only requirement to follow this tutorial.
Let's Start Building 👨💻
Create a new Flutter project using Android Studio or by using the flutter create command in terminal. flutter create --local_ease creates a flutter project in the local_ease directory. Inside the lib folder is the main.dart file, which is starting point of our application, and then we have pubspec.yaml file to manage project dependencies. We need the following dependencies for our project
dependencies:
  flutter:
    sdk: flutter
  cupertino_icons: ^1.0.2
  google_fonts: ^4.0.0
  appwrite: ^9.0.0
  shared_preferences: ^2.1.0
  uuid: ^3.0.7
  date_time_picker: ^2.1.0
  open_street_map_search_and_pick: ^0.0.17
  url_launcher: ^6.1.11
  file_picker: ^5.0.2
  carousel_slider: ^4.2.1
After adding them, run flutter pub get in your project root directory to install all these dependencies.
Creating your Appwrite Project
Login to https://cloud.appwrite.io and click on Create project button from the dashboard
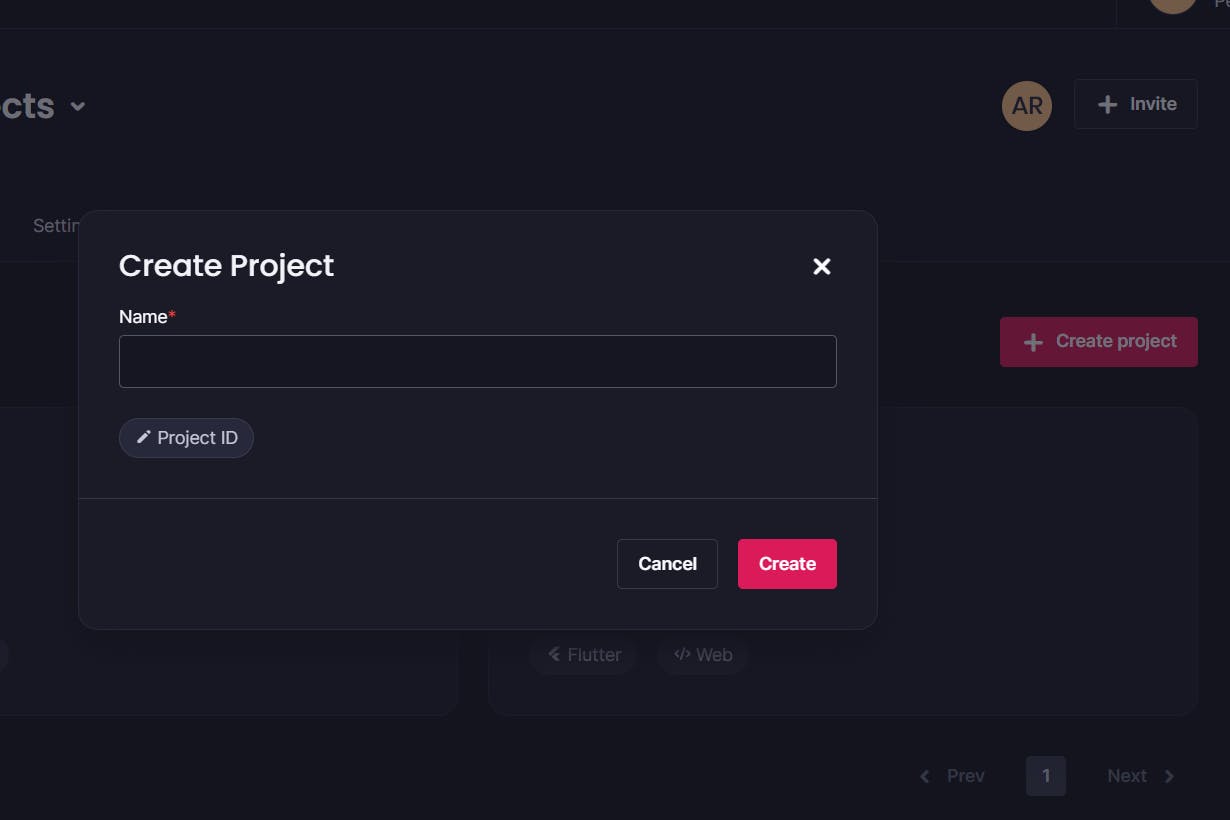
Give your project a name, hit the Create button, and your Appwrite project is ready 🎉
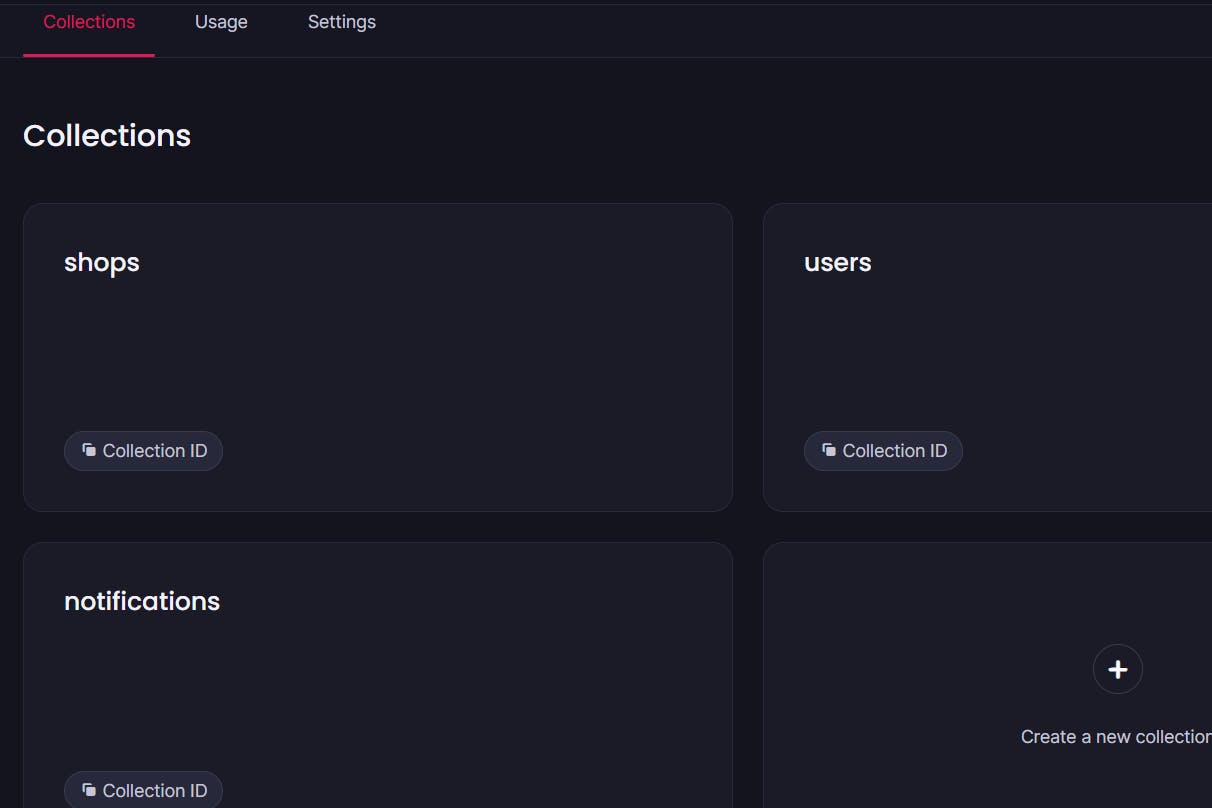
Click on the Databases menu in the navbar and create a new database. We need to create three collections for this project inside this database, i.e., shops, users, and notifications collections.
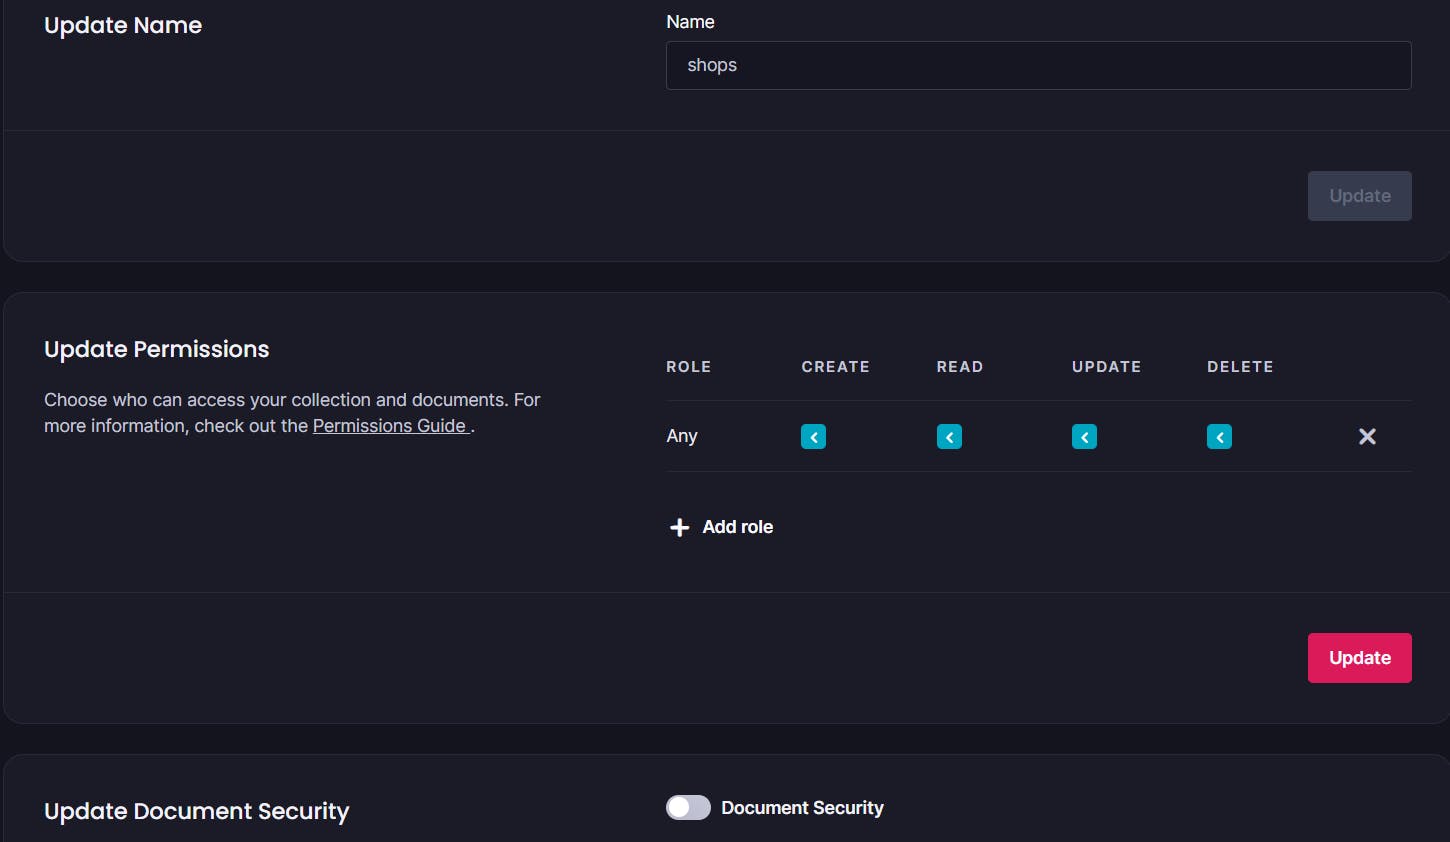
Go to settings and update permissions. This would help you to control who has what access and permissions to the docs inside the collections. I will go with any and allow all the permissions. We will create collections attributes and indexes later on.
Click on the Storage menu and create a new storage bucket Photos, to store all app photos. Here as well, go to settings and update permissions to any.
Right next to the name of your project, database, collections, and storage bucket, you have the copy ID button. Use that to copy your IDs; we will use them in our client app.
Now let's go back to the Overview menu and Add a Platform. Iets add our Flutter app. We need to add the app name and package name, and the app will be added to your project. You can add more platforms if you want them to access your project.
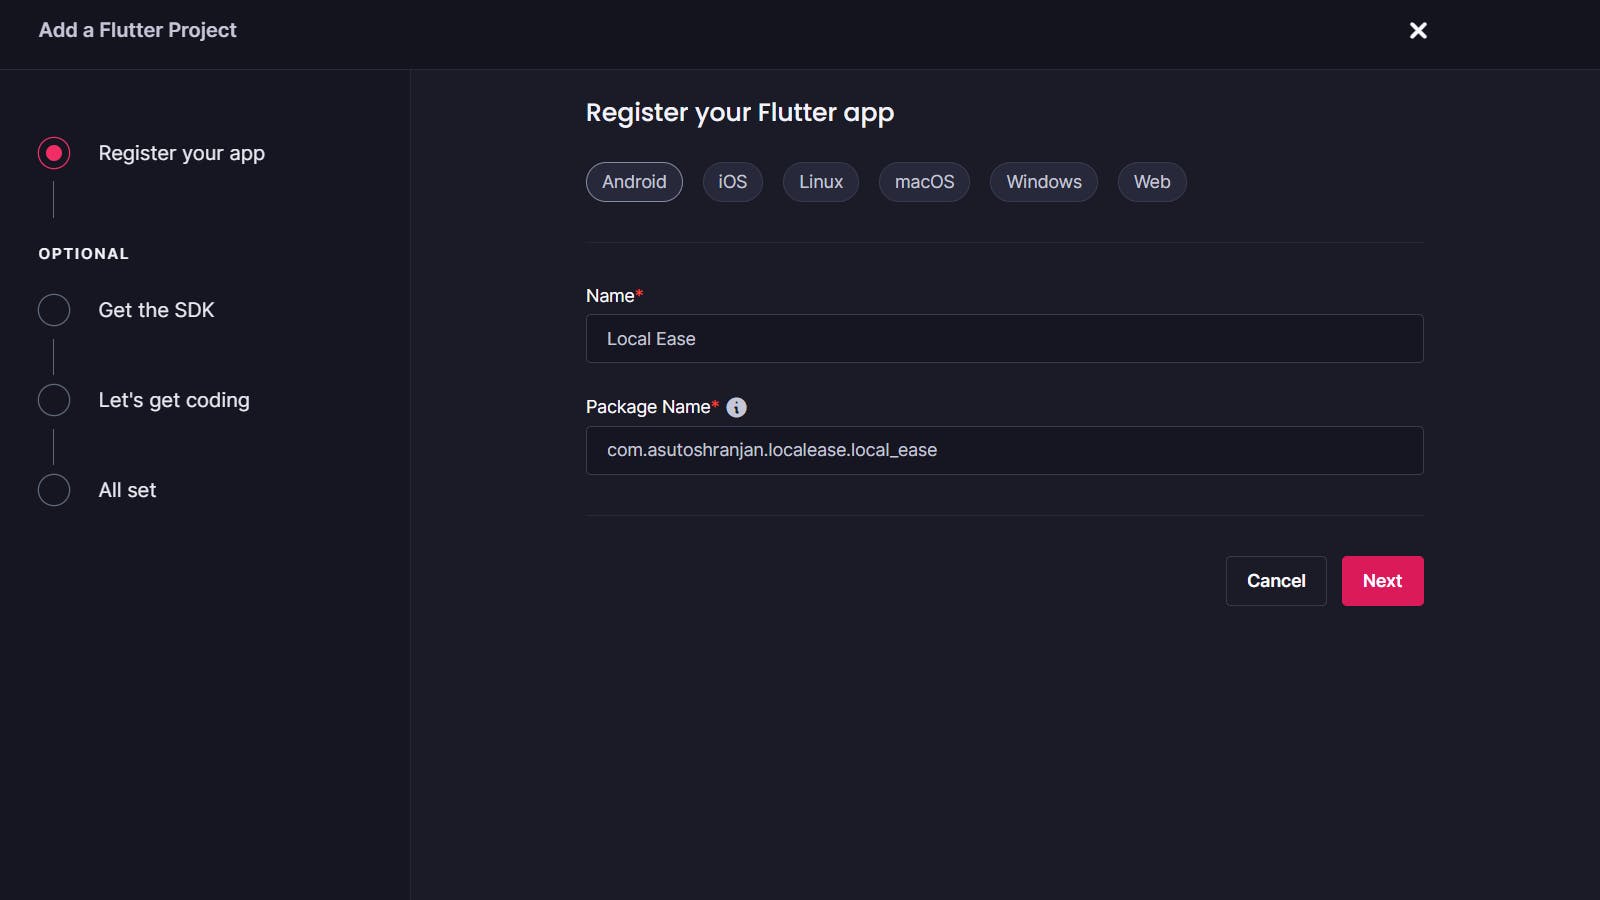
Setting Project themes and credentials
While building any frontend app, having a consistent theme and design results in a good end-user experience. So let's add our project theme, styles, colors, and font sizes to the themes folder. Add Size Config having the device size to scale components in the utils folder. Then also add the Appwrite credentials, i.e., project id, endpoint, database id, collection ids, and storage bucked ids to the credentials.dart file in utils folder.
//credentials.dart
class Credentials {
  static const String DatabaseId = "YourDatabaseID";
  static const String ShopsCollectionId = "YourShopsCollectionID";
  static const String UsersCollectonId = 'YourUsersCollectionID';
  static const String APIEndpoint = "https://cloud.appwrite.io/v1";
  static const String ProjectID = "YourProjectID";
  static const String NotificationCollectionId = 'YourNotificationCollectionID';
  static const String PhotosBucketId = "YourPhotosBucketID";
}
Initializing Appwrite client
Now let's initialize our Appwrite client in main.dart file and scope it globally so that we can call it anywhere throughout the project.
import 'package:appwrite/appwrite.dart';
import 'package:flutter/material.dart';
import 'package:local_ease/launch_screens/splash_screen.dart';
import 'package:local_ease/theme/app-theme.dart';
import 'package:local_ease/utils/credentials.dart';


Client client = Client();

void main() {
  WidgetsFlutterBinding.ensureInitialized();
  client.setEndpoint(Credentials.APIEndpoint).setProject(Credentials.ProjectID).setSelfSigned(status: true);
  runApp(const MyApp());
}

class MyApp extends StatelessWidget {
  const MyApp({super.key});

  @override
  Widget build(BuildContext context) {
    return MaterialApp(
      debugShowCheckedModeBanner: false,
      title: 'LocalEase',
      theme: AppTheme.lightTheme,
      home: const SplashScreen(),
    );
  }
}
User Authentication
After the material app launches, we want to start the application by launching a splash screen that checks if the user is logged in and routes to the customer or seller home screen, depending on the logged-in account. If the user is not logged in, routes to the login page.
class SplashScreen extends StatefulWidget {
  const SplashScreen({Key? key}) : super(key: key);

  @override
  State<SplashScreen> createState() => _SplashScreenState();
}

class _SplashScreenState extends State<SplashScreen> {

  @override
  void initState() {
    super.initState();
    Future.delayed(const Duration(milliseconds: 3500), () async {
      getUserStatus();
    });
  }


  void getUserStatus() async {
    await APIs.instance.isLoggedIn().then((isLoggedIn) {
      if (isLoggedIn) {

        APIs.instance.getUser().then((currentUser) {
          if (currentUser == null) {
            Navigator.pushReplacement(
              context,
              MaterialPageRoute(
                builder: (_) => const ChooseAccountType(),
              ),
            );
          } else if (currentUser.type == "Consumer") {
            Navigator.pushReplacement(
              context,
              MaterialPageRoute(
                builder: (_) => const HomePage(),
              ),
            );
          } else if (currentUser.type == "Seller") {
            Navigator.pushReplacement(
              context,
              MaterialPageRoute(
                builder: (_) => const SellerHomePage(),
              ),
            );
          }
        });

      } else {
        Navigator.pushReplacement(
          context,
          MaterialPageRoute(
            builder: (_) => const LoginPage(),
          ),
        );
      }
    });
  }


  @override
  Widget build(BuildContext context) {
    SizeConfig().init(context);
    return YourSplashScreenWidget();
  }
}
Now let's write our auth logic and prepare the Login and SignUp page. We will use email-password authentication to authenticate our users. After auth, we can ask for the role if they want to continue as store owners or customers and route them accordingly later. First, create a new directory inside lib named apis inside this directory. Create a file named APIs.dart here we will write all the functions for auth, CRUD operations, and other app feature logic. We will use SharedPreferences to store the auth state locally in the device.
// APIs.dart
class APIs {
  APIs._privateConstructor();
  static final APIs _instance = APIs._privateConstructor();
  static APIs get instance => _instance;
  static final Future<SharedPreferences> _prefs =
      SharedPreferences.getInstance();

  static final account = Account(client);

  static final databases = Databases(client);

  static final storage = Storage(client);

  var uuid = Uuid(); // Generates UniqueIDs

  Future<String?> getUserID() async {
    final SharedPreferences prefs = await _prefs;
    return prefs.getString('userId');
  }

  Future<bool> isLoggedIn() async {
    final SharedPreferences prefs = await _prefs;
    return prefs.getBool('isLoggedIn') ?? false;
  }

  static Future<void> setLoggedIn(bool value) async {
    final SharedPreferences prefs = await _prefs;
    prefs.setBool('isLoggedIn', value);
  }

  Future<bool> loginEmailPassword(String email, String password) async {
    final SharedPreferences prefs = await _prefs;
    try {
      final models.Session response =
          await account.createEmailSession(email: email, password: password);
      prefs.setString('userId', response.userId);
      prefs.setString('email', email);
      prefs.setString('password', password);
      setLoggedIn(true);
      return true;
    } catch (e) {
      rethrow;
    }
  }

  Future<bool> signUpEmailPassword(
      String email, String password, String name) async {
    final SharedPreferences prefs = await _prefs;
    try {
      await account.create(
        userId: ID.unique(),
        email: email,
        password: password,
        name: name,
      );
      final models.Session response = await account.createEmailSession(
        email: email,
        password: password,
      );

      prefs.setString('userId', response.userId);
      prefs.setString('email', email);
      prefs.setString('password', password);
      setLoggedIn(true);
      return true;
    } catch (e) {
      rethrow;
    }
  }

  logout() async {
    final SharedPreferences prefs = await _prefs;
    setLoggedIn(false);
    prefs.remove('userId');
    prefs.remove('email');
    prefs.remove('password');
  }
}
Now you can use these functions in your login and signup page to authenticate users and log out a user from your app in the profile page. After a user logs in, we want to add them to the user collection, and depending on the account type they choose, we may add them to the shops collection if they continue as a shop owner.
User Type Consumer/Seller
If a user chooses a seller account, we want to route them to the seller home screen where they can manage their store on the managing store page, send notifications and view subscribers on the insights page, and view or edit their profile and log out of the account page. Alternatively, if the user chooses to view stores, we want to route them to the customer home screen. It would have four bottom nav bar menus Near you, the landing screen where users can view the nearby stores. Subscriber page to view the users subscribed stores, alert page to view all notifications and alerts, and profile page to manage the user profile.
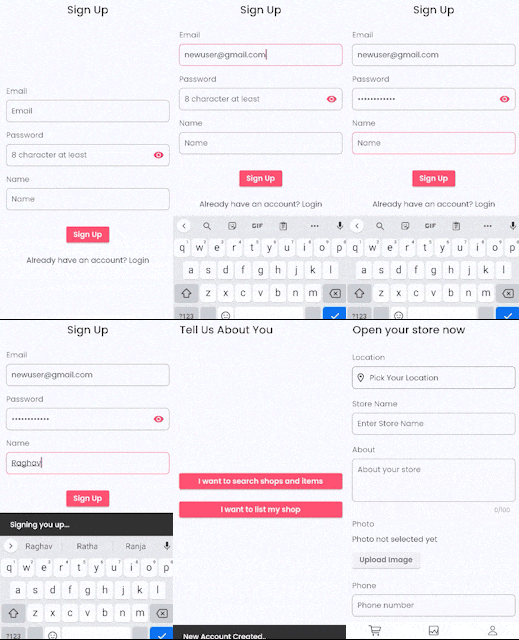
Model Classes and adding attributes to collections
Now let's create model classes for users, shops, and notifications. This will help you to convert the response data to model objects and object back to JSON when needed. We would also add attributes to our database collections.
// user_model.dart
class MyUserModel{
  String? name; List? following; List? notifications; String? email; String? photo; String? type; String? docId; String? createdAt; String? address; String? lat; String? long; String? country; String? pincode; String? district;

  MyUserModel({this.name, this.following, this.notifications, this.email, this.photo, this.docId, this.type, this.createdAt, this.address, this.lat, this.long, this.district, this.pincode, this.country});
  MyUserModel.fromJson(Map<String,dynamic> json){
    name = json['name'];
    following = json['following'];
    notifications = json['notifications'];
    email = json['email'];
    photo = json['photo'];
    type = json['type'];
    docId = json['docid'];
    createdAt = json['\$createdAt'];
    country = json['country'];
    pincode = json['pincode'];
    district = json['district'];
    lat = json['lat'];
    long = json['long'];
    address = json['address'];
  }

  Map<String, dynamic> toJson(){
    final data = <String, dynamic>{};
    data['name'] = name;
    data['following'] = following;
    data['notifications'] = notifications;
    data['email'] = email;
    data['photo'] = photo;
    data['type'] = type;
    data['docid'] = docId;
    data['country'] = country;
    data['pincode'] = pincode;
    data['district'] = district;
    data['lat'] = lat;
    data['long'] = long;
    data['address'] = address;
    return data;
  }
}
class ShopModel {
  String? name; String? about; bool? isOpen; List? items; List? outStock; String? country; String? pincode; String? district; String? phone; String? email; String? opens;  String? closes; String? ownerId; List? subscribers; String? lat; String? long; String? address; String? photo;

  ShopModel({this.name,this.about,this.isOpen,this.items,this.outStock,this.subscribers,this.country,this.pincode,this.district,this.email,this.photo,this.lat,this.long,this.phone,this.address,this.closes,this.opens,this.ownerId});
  ShopModel.fromJson(Map<String, dynamic> json) {
    name  = json['name'];
    about = json['about'];
    isOpen = json['isopen'];
    items = json['items'];
    outStock = json['outstock'];
    country = json['country'];
    pincode = json['pincode'];
    district = json['district'];
    phone = json['phone'];
    email = json['email'];
    opens = json['opens'];
    closes = json['closes'];
    ownerId = json['ownerid'];
    subscribers = json['subscribers'];
    lat = json['lat'];
    long = json['long'];
    address = json['address'];
    photo = json['photo'];
  }

  Map<String, dynamic> toJson() {
    final data = <String, dynamic>{};
    data['name'] = name ;
    data['about'] = about;
    data['isopen'] = isOpen;
    data['items'] = items;
    data['outstock'] = outStock;
    data['country'] = country;
    data['pincode'] = pincode;
    data['district'] = district;
    data['phone'] = phone;
    data['email'] = email;
    data['opens'] = opens;
    data['closes'] = closes;
    data['ownerid'] = ownerId;
    data['subscribers'] = subscribers;
    data['lat'] = lat;
    data['long'] = long;
    data['address'] = address;
    data['photo'] = photo;

    return data;
  }
}
To create an attribute in a database collection, go to the attributes tab in the collection and click on the Create attribute button. Add details like attribute key, attribute type, and size, then hit Create to add an attribute.
Note: You must select the array field if the attribute is an array.
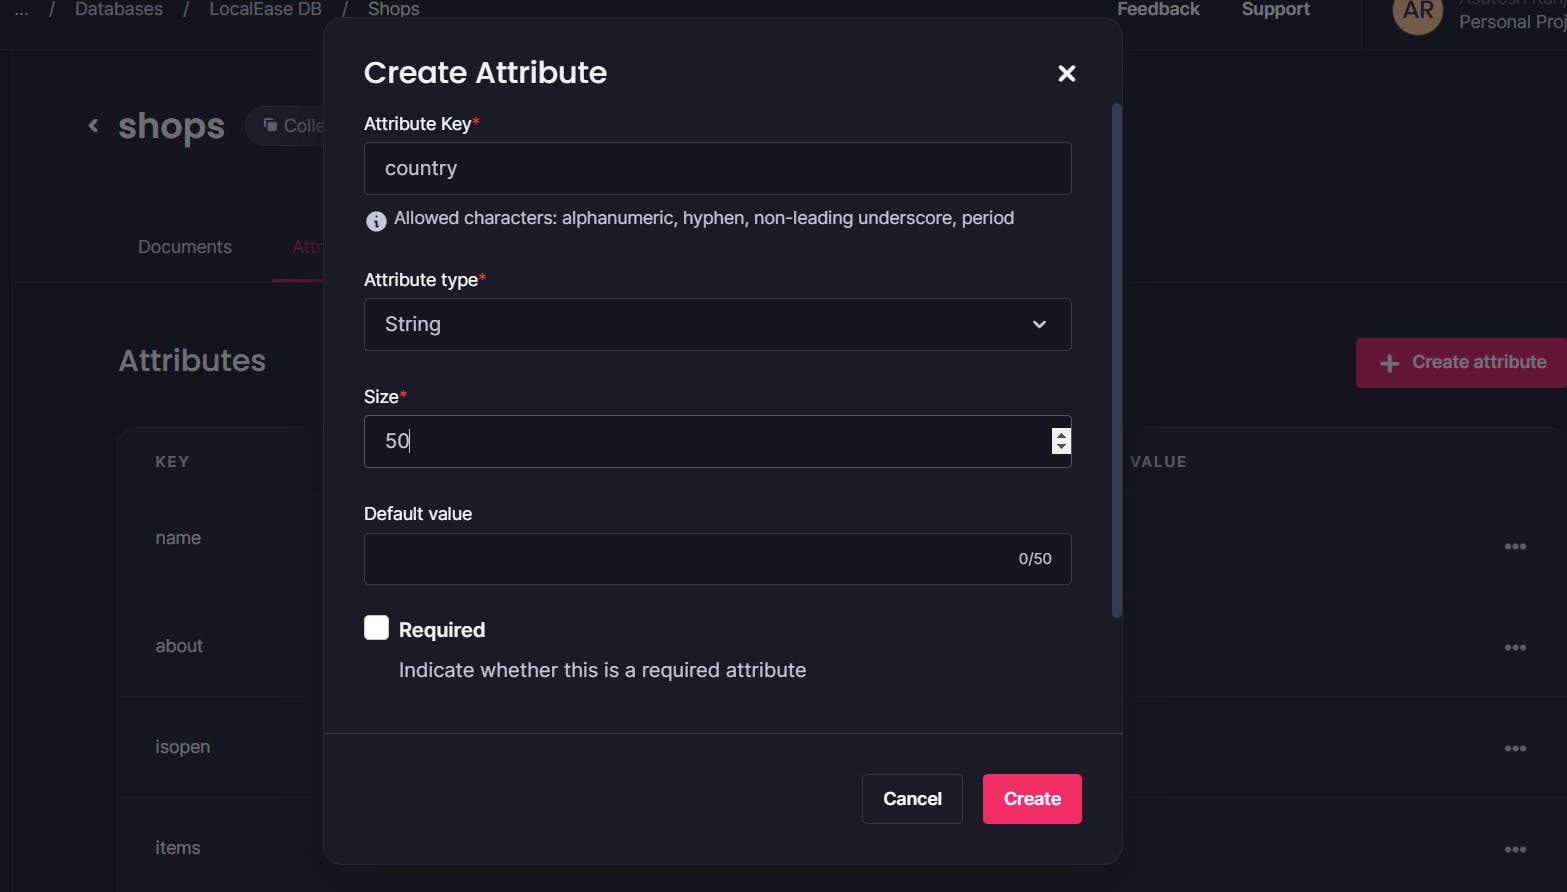
CRUD operations with Appwrite database
As we have already initialized our Appwrite database and storage with the client. We are all set to write our CRUD functions in the same APIs.dart file
// APIs.dart
// Database CRUD Operation Functions

// get loggedin store
  Future<ShopModel?> getStore() async {
    ShopModel? myShopModel;

    try {
      await getUserID().then((userId) async {
        await databases
            .getDocument(
          databaseId: Credentials.DatabaseId,
          collectionId: Credentials.ShopsCollectionId,
          documentId: userId!,
        )
            .then((value) {
          if (value.data != null) {
            myShopModel = ShopModel.fromJson(value.data);
          }
        });
      });

      return myShopModel;
    } catch (e) {
      return myShopModel; // Returns null
    }
  }


  /// Get Stores By Id
  Future<ShopModel?> getStoreById(String id) async{
    ShopModel? myShopModel;

    try {
      final result = await databases
          .getDocument(
        databaseId: Credentials.DatabaseId,
        collectionId: Credentials.ShopsCollectionId,
        documentId: id,
      );
      myShopModel = ShopModel.fromJson(result.data);

      return myShopModel;
    } catch (e) {
      return myShopModel;
    }

  }

  /// Create Store
  Future<void> createShop({
    required ShopModel currentShop,
  }) async {
    try {
      await getUserID().then((userId) async {
        ShopModel myShop = currentShop;
        myShop.ownerId = userId;
        myShop.subscribers = [];
        myShop.isOpen = true;
        await databases.createDocument(
          databaseId: Credentials.DatabaseId,
          collectionId: Credentials.ShopsCollectionId,
          documentId: userId!,
          data: myShop.toJson(),
        );
      });
    } catch (e) {
      rethrow;
    }
  }

  /// Update Store
  Future<void> updateShopInfo(ShopModel currentShop) async {
    try {
      await databases.updateDocument(
        databaseId: Credentials.DatabaseId,
        collectionId: Credentials.ShopsCollectionId,
        documentId: currentShop.ownerId!,
        data: currentShop.toJson(),
      );
    } catch (e) {
      rethrow;
    }
  }

  /// Delete Account's Store
  deleteShop(ShopModel currentShop) async {
    try {
      await databases.deleteDocument(
        databaseId: Credentials.DatabaseId,
        collectionId: Credentials.ShopsCollectionId,
        documentId: currentShop.ownerId!,
      );
    } catch (e) {
      rethrow;
    }
  }

  /// get loggedin user
  Future<MyUserModel?> getUser() async {
    MyUserModel? currentUser;
    await getUserID().then((userId) async {
      try {
        await databases
            .getDocument(
          databaseId: Credentials.DatabaseId,
          collectionId: Credentials.UsersCollectonId,
          documentId: userId!,
        )
            .then((value) {
          if (value.data != null) {
            currentUser = MyUserModel.fromJson(value.data);
          }
        });
      } catch (e) {
        return currentUser;
      }
    });
    return currentUser;
  }

  /// Create New User
  Future<void> createUser({
    required String type,
  }) async {
    await account.get().then((user) {
      MyUserModel newUser = MyUserModel(
        name: user.name,
        email: user.email,
        following: [],
        notifications: [],
        photo: "https://cdn-icons-png.flaticon.com/512/266/266033.png",
        type: type,
        docId: user.$id,
      );
      databases.createDocument(
        databaseId: Credentials.DatabaseId,
        collectionId: Credentials.UsersCollectonId,
        documentId: user.$id,
        data: newUser.toJson(),
      );
    });
  }

  // Update User
  Future<void> updateUserInfo(MyUserModel currentUser) async {
    try {
      await databases.updateDocument(
        databaseId: Credentials.DatabaseId,
        collectionId: Credentials.UsersCollectonId,
        documentId: currentUser.docId!,
        data: currentUser.toJson(),
      );
    } catch (e) {
      rethrow;
    }
  }

 /// Add a new notification
  Future<void> createNotification(NotificationModel currentNotification) async{
     getStore().then((myShop) async{
          String docId = uuid.v1();
          NotificationModel myNotification = currentNotification;
          myNotification.notificationId = docId;
          myNotification.shopid = myShop!.ownerId;
          myNotification.users = myShop.subscribers;
          try {
           await databases.createDocument(
              databaseId: Credentials.DatabaseId,
              collectionId: Credentials.NotificationCollectionId,
              documentId: docId,
              data: myNotification.toJson(),
            );

           List<MyUserModel> subUsers = await getSubscribedUsers();

           for (MyUserModel user in subUsers) {
             user.notifications!.add(docId);
             await updateUserInfo(user);
           }
           log("Notif sent");
          } catch (e) {
            rethrow;
          }
      });
  }
These functions can be used to manage stores, update store items, send notifications, and update user info throughout the application. You can see the exact usage in the source code.
Subscribing to Realtime events
To view the store details and store items in real time, we will use Appwrites Realtime APIs. As we are also sending the subscribed users notification, we will subscribe to changes in the notification collection to show alert popups. The following example is a guide for using Realtime API in Flutter.
class NearYouPage extends StatefulWidget {
  const NearYouPage({Key? key}) : super(key: key);

  @override
  State<NearYouPage> createState() => _NearYouPageState();
}

class _NearYouPageState extends State<NearYouPage> {
  String databaseId = Credentials.DatabaseId;
  String collectionId = Credentials.ShopsCollectionId;
  late RealtimeSubscription subscription;
  // to store and update you data in realtime
  List<Map<String, dynamic>> items = [];

  @override
  void initState() {
    super.initState();
    loadItems();
    subscribe();
  }

  //initally loading all the docs in the collection and storing it all in the items list
  loadItems() async {
    try {
      await databases.listDocuments(
        databaseId: databaseId,
        collectionId: collectionId,
      ).then((value) {
        var currentDocs = value.documents;
        setState(() {
          items = currentDocs.map((e) => e.data).toList();
        });
      });

    } on AppwriteException catch (e) {
      print(e.message);
    }
  }

  // Subscribing to the events in collection documents
  void subscribe() {
    final realtime = Realtime(client);

    subscription = realtime.subscribe(
        ['databases.$databaseId.collections.$collectionId.documents']);

    // listen to changes
    subscription.stream.listen((data) {
      log("there is some change");
      // data will consist of `events` and a `payload`
      if (data.payload.isNotEmpty) {
        log("there is some change");
        if (data.events.contains("databases.*.collections.*.documents.*.create")) {
          var item = data.payload;
          log("Item Added");
          items.add(item);
          setState(() {});
        } else if (data.events
            .contains("databases.*.collections.*.documents.*.delete")) {
          var item = data.payload;
          log("item deleted");
          items.removeWhere((it) => it['\$id'] == item['\$id']);
          setState(() {});
        } else if (data.events
            .contains("databases.*.collections.*.documents.*.update")) {
          var item = data.payload;
          log("item update");
          int idx = items.indexWhere((it) => it['\$id'] == item['\$id']);
          log("${idx} is the index");
          items[idx] = item;
          setState(() {});
        }
      }
    });
  }

  @override
  void dispose() {
    subscription.close();
    notifSubscription.close();
    super.dispose();
  }

  @override
  Widget build(BuildContext context) {
    return YourWidgetShowingItemsDataInRealTime();
  }
}
Sending Notifications to Subscribed Users
To achieve this, we add the notification data as a doc to the notification collection in our projects database, and the subscribed users' notification lists are updated by adding the new notification IDs. The notification data also has a list of target user IDs. So we can listen to the events in the notification collection, and if a notification is added and the target list has the ID of a user, we can show them an alter dialogue.
// APIs.dart
/// sending a new notification
  Future<void> createNotification(NotificationModel currentNotification) async{
     getStore().then((myShop) async{
          String docId = uuid.v1();
          NotificationModel myNotification = currentNotification;
          myNotification.notificationId = docId;
          myNotification.shopid = myShop!.ownerId;
          myNotification.users = myShop.subscribers;
          try {
           await databases.createDocument(
              databaseId: Credentials.DatabaseId,
              collectionId: Credentials.NotificationCollectionId,
              documentId: docId,
              data: myNotification.toJson(),
            );
           List<MyUserModel> subUsers = await getSubscribedUsers();
           for (MyUserModel user in subUsers) {
             user.notifications!.add(docId);
             await updateUserInfo(user);
           }
           log("Notif sent");
          } catch (e) {
            rethrow;
          }
      });
  }
Filtering collection data with Queries
We can filter and sort docs in a collection, showing only the relevant results using queries. The queries can be of a single attribute or may have multiple attributes. To use queries, we also need to create indexes.
To create an index on an attribute, go to Indexes tab of the collection and click on Create Index. Now give your index a name, index type, attribute, and order. To create an index on multiple attributes add them using the add attribute button.
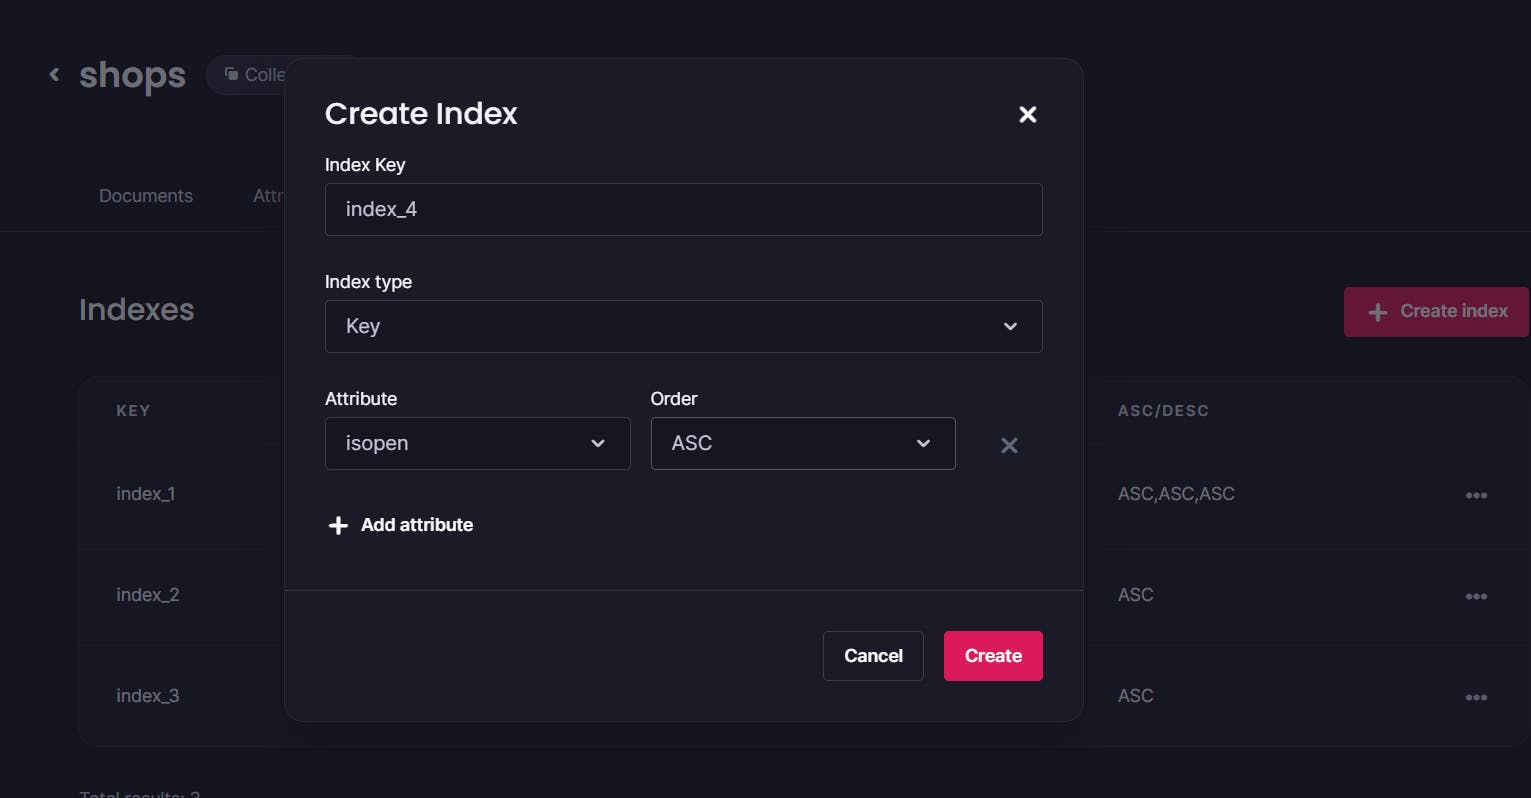
In the example below, you can see that we can use queries to get all the notifications sent by a shop and sort them according to their creation time.
// APIs.dart
// to get all the notifications sent by a shop
Future<List<NotificationModel>> getShopNotifications() async {
    List<NotificationModel> myNotifications = [];

    try {
      String? userId = await getUserID();
      final result = await databases.listDocuments(
        databaseId: Credentials.DatabaseId,
        collectionId: Credentials.NotificationCollectionId,
        queries: [
          Query.equal("shopid", userId),
          Query.orderDesc("\$createdAt"),
        ],
      );
     myNotifications = result.documents.map((e) => NotificationModel.fromJson(e.data)).toList() ?? [];

      return myNotifications;
    } catch (e) {
      return myNotifications;
    }
  }
Searching with Full-text search
We also have a search feature to search and find all the relevant stores.
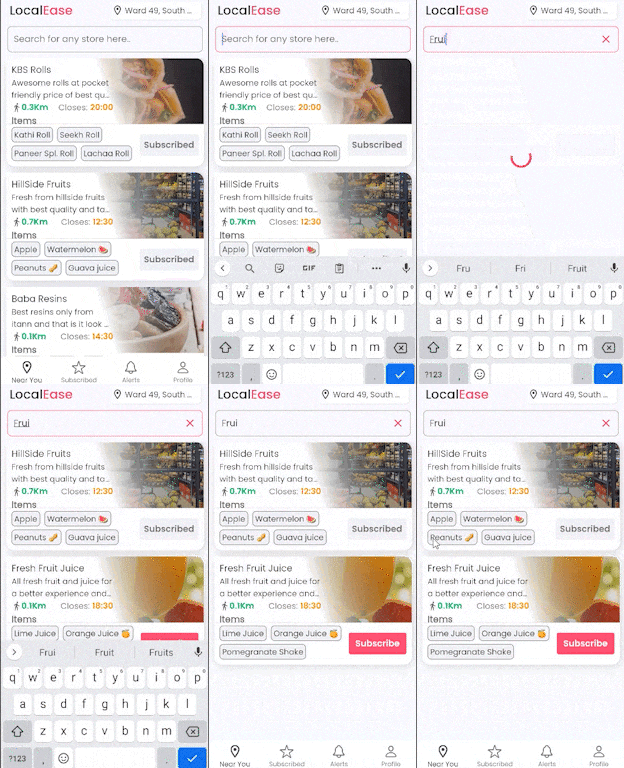
To do this, we need to create a FullText type index on the search attribute and use Query.search method on the attribute as shown in this example.
FutureBuilder(
    future: databases.listDocuments(
     databaseId: databaseId,
     collectionId: collectionId,
     queries: [Query.search("name", txtQuery)],),
    builder: (context, snapshot) {
     if (snapshot.connectionState == ConnectionState.done) {
        if (snapshot.hasError) {
           return Center( child: Text('${snapshot.error} occurred',),);
        } else if (snapshot.hasData && snapshot.data != null) {
            List<ShopModel> resultShops = snapshot.data!.documents .map((e) => ShopModel.fromJson(e.data)).toList() ?? [];
            if (resultShops.isNotEmpty) {
                return ListView.builder(
                        physics: const BouncingScrollPhysics(),
                        itemCount: resultShops.length,
                        itemBuilder: (context, index) {
                          ShopModel shop = resultShops[index];
                          return  MyCards( current_obj: shop.toJson(),
                  },
              );
           } else { return Padding(
                      padding: const EdgeInsets.only(left: 15),
                      child: Text("Sorry! Cannot find any relevant result", style: textTheme.titleMedium!.copyWith( fontSize: 18, color: AppColors.orange),),
                      );
                  }
               }
            }
            return const Center(child: CircularProgressIndicator(),
     );
}),
This brings us to the end of the guide on building an online store platform that connects users with local shops and small businesses using Flutter and Appwrite.

You can find the complete source code in this GitHub Repository.
Feel free to reach out if you have any queries or say hi on Twitter
Learn more, ask questions on the Appwrite Discord server, and join the community
Keep Building!! 🛠️